BoB the overseer
Originally uploaded by Murano Silver
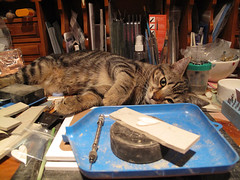
BoB likes to make sure my workin's are up to standard!
Every so often his paw flicks out until I've tickled his chin enough for me to continue (BoBs quality control "wages" lol)
BoB likes to make sure my workin's are up to standard!
Every so often his paw flicks out until I've tickled his chin enough for me to continue (BoBs quality control "wages" lol)


 After mixing it produces the smoothest loveliest clay that is really flexible and a pleasure to work with (this is the same for all of Hadars clays).
This version shows the solder flowed on the base, then the cuff-link finding brought in ~ you'll find an alternative version on my Flickr stream showing the solder being put onto the finding and then brought onto the preheated PMC base.
(Use whichever works best for you)
Written Instructions for prep etc on on this blog post
http://pmctips.blogspot.com/2009/08/soldering-pmc-or-art-clay-silver-cuff.html
Happy making
Nic xx
p.s. The creaking noise was my chair, lol
Mini-vid tutorial on making a fingerprint charm.
Here are the Key points:
1) Make sure you have everything to cutters/rollers etc ready before your start.
2) Use thicker slats to allow enough clay for the finger to push into.
3) If the print doesn't look clean then roll it up, re-condition the clay and start again :)
4) Leave enough edge to drill a hole for the jump ring to go through.
5) Dry it thoroughly (a warm room overnight is good)
6) Sand & clean the edges (or use a baby wipe to clean up the edge if it's neat enough already)
7) For maximum strength kiln fire but if you haven't got one of those torch or hob fire in a VERY well ventilated area.
(Instructions for this are on this blog)
Happy Making
Nic xx